

Introduction To Blogging
Blogs are different from static websites, You have to update it with fresh article in order to get loyal readers and Search Engine visibility. There are lots of blogging platforms which lets you to create blogs for free, But the most popular blogging platforms are Bolgger and Wordpress.
Blogger platform is owned by Google and its completely free of charges. Its really simple to create a blog on blogger platform, You just have to visit blogger.com and sign in with your Google credentials. The simple user interface of Blogger will navigate you trough out from creating your to adding your first Post.
Wordpress can be said as the Professional Blogging Platform. Creating a blog on Self hosted Wordpress is little more complicated than Blogger. But once you finishes setting up and installing your blog, It would be easier to manage and spice up your blog as there are lots of Free Plugins and Free Themes to help you on the way.
Blogging On Wordpress
For creating a Self Hosted Wordpress Blog, Mainly you need 2 things, 'Domain' and 'Web Hosting Account'. Domain is the address of your blog (ex: 1001tricks.com) and Hosting is the online space required for hosting your blog. There are many online services which provides 'Web Hosting'(ex: Hostgator) and 'Domain'(ex: Godaddy.com, Bigrock.com) but they are paid services, As a newcomer, You can try wordpress by using Free Domain and Free Hosting. Ready? If yes, Then follow my step by step procedure for creating your very first Wordpress Blog.
Step 1: Download Wordpress To Your PC
We have to prepare a wordpress installation files for uploading to our web server. Follow the steps below;
- Got to Wordpress.org/Download and Download the latest version of wordpress.

- Extract the downloaded 'wordpress-3.4.zip' file with 7zip or winrar. You'll get a new folder named 'wordpress' with some file inside.Keep that, We need those files in the following steps.

Step 2: Register A Free Domain Name
Dot.tk is a free domain registrar service which lets us to create domain names ending with the extension .TK (ex: www.googleio2012.tk) totally for free, No charges for renewals too. So follow below steps for registering a free domain name with dot.tk registrar.
- Visit www.dot.tk and enter your desired domain name and then click 'Go'.

- If the entered domain is available, You'll get taken to the next step. You have to change the following details on the second step.

- On 'Use Your Domain' section, Click on 'Use DNS' then select 'Your Own DNS' tab and enter the following addresses on 'Server Name' field. ns01.000webhost.com and
ns02.000webhost.com respectively.

- On 'Registration Length' change '3 Months' to '12 Months'.
- Enter the verification code as shown in the image and click 'Sign Up'.

- After clicking 'Sign Up' a small box will appear. From that, click on any service (Facebook, Google, Yahoo) to complete your registration process(You can also use your email id for registering. Remember, You have to remember the method you have chosen to sign up for later use.

- That's it, You've successfully registered and set you domain name to use with 000webhost.


There are some websites which provides Webhosting Service absolutely for Free. I recommend you to use 000webhost.com as your Free Web Hosting Account. Follow the steps below for registering a Free Web hosting account.
- Go to http://www.000webhost.com/ and click 'Order Now' to Sign up for an account.
- Enter your newly created dot.tk website address on 'I want to host my own domain' section.

- Provide other information like (Your Name, Email id, Password) and enter the captcha word as shown in the image and click 'Create My Account'.
- After registering, 000webhost will send you a confirmation link to the email address which you have provided while registering. Go to your Email inbox and check for the email from 000webhost, Find the mail and click on the confirmation link included in that mail.

- After click on the Confirmation Link, Your account will get activated.
- Go to http://members.000webhost.com and provide your email and password, Then click Login.
- Click on 'Go to Cpanel' right to your domain name.
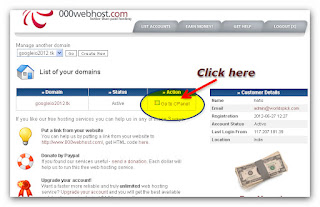
- Click 'MySQL' for creating a new database file.

- Enter details of database file (ex: database name: wp, username: user, and password). You have to remember of save this some where. And click 'Create Database'.

- The return to your control panel and click 'View Account Details'.

- In that page you can view all the information related to your account. Keep that page opened, Next step is to upload the Wordpress installation file to 000webhost server using FTP software.


Step 4: Upload Wordpress Installation Files To Web Host By Using FTP
Now we have to transfer the Wordpress installation file that we prepared using STEP 1 to the 000webhost server using an FTP software called Filezilla. Follow the instruction to do that;
- Visit
www.filehippo.com/download_filezilla/ and download the latest version of Filezilla software.
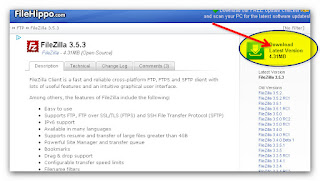
- Install Filezilla on your computer, And open it after finishing Installation.
- Enter FTP credentials(Host, Username, Password, and Port) on the 'Quickconnect' Tab.
- Enter your domain name as Host(ex: googleio2012.tk), You'll get the FTP Username from 'View Account Details' section of 000webhost Control Panel, Password is same as your 000webhost account login password. Usually it will be some numbers. And enter '21' in the filed of 'Port'. After entering those details, Press 'Quickconnect'.

- Double click 'public_html' folder.

- Delete the existing files from that directory(public_html), Just select the files and press 'Delete'.
- Then upload the Wordpress Installation Files that we prepared using Step 1 into that directory. Open the folder 'Wordpress' which we prepared using Step 1 and Select All files in that folder, Then Drag and Drop it to the FTP Software. See the video embedded below.
- Wait for the process to finish, It will take some minutes.
- After finishing transfer, Close the Filezilla FTP client.


If you have finished all the 4 steps explained above, Then your domain will be ready to setup Wordpress installation.
- Visit to your domain name (ex: http://googleio2012.tk).
- You'll see a configuration page, Click 'Create A Configuration File'.

- Click 'Let's Go!' from the next page.

- On the next page, You have to enter the Details of MySQL Database Account you have created while following Step 3. On Database Host section, Enter mysql4.000webhost.com its the default for 000webhost. And the Password is the password that you've given for your MySQL database on Step 3. After entering those details, Click 'Submit'.

- Click 'Run the install' from next page.
- On next page, Enter your Blog Site Title, Wordpress Site Username and Password(You must remember this for loging into your wordpress blog.)

- Click 'Install Wordpress' after entering those details.
- Click 'Login' from next page.
- You'll get redirected to wordpress administrator login page. Enter your username and password that you just created, In the fields of Username and Password. After entering your credentials, Click 'Login'.

- That's it, You have just created your First Wordpress blog. Visit your domain name to see your live blog(ex: http://googleio2012.tk). And for accessing administrator dashboard add /wp-admin followed by your domain name(ex: http://googleio2012.tk/wp-admin).


Congratulations! You are now owner of a self hosted wordpress blog. Now its time to play around it and to make some changes to the blog layout.
- Install New Themes.
- Delete the default Posts, Categories, and Pages.
- Add your own Posts.
Visit http://codex.wordpress.org/First_Steps_With_WordPress for some quick information about your wordpress blog.
For now, That's what I've for now, coz I'm really tired.
I'll share some information related to SEO(Search Engine Optimization) and Money Making Tips on my upcoming Blog Posts.
I'll share some information related to SEO(Search Engine Optimization) and Money Making Tips on my upcoming Blog Posts.
Don't Forget To Share This Page With Your Friends... :)